

HTML & Forms
REST framework is suitable for returning both API style responses, and regular HTML pages. Additionally, serializers can be used as HTML forms and rendered in templates.
Rendering HTML
In order to return HTML responses you'll need to use either TemplateHTMLRenderer, or StaticHTMLRenderer.
The TemplateHTMLRenderer class expects the response to contain a dictionary of context data, and renders an HTML page based on a template that must be specified either in the view or on the response.
The StaticHTMLRender class expects the response to contain a string of the pre-rendered HTML content.
Because static HTML pages typically have different behavior from API responses you'll probably need to write any HTML views explicitly, rather than relying on the built-in generic views.
Here's an example of a view that returns a list of "Profile" instances, rendered in an HTML template:
views.py:
from my_project.example.models import Profile
from rest_framework.renderers import TemplateHTMLRenderer
from rest_framework.response import Response
from rest_framework.views import APIView


class ProfileList(APIView):
    renderer_classes = [TemplateHTMLRenderer]
    template_name = 'profile_list.html'

    def get(self, request):
        queryset = Profile.objects.all()
        return Response({'profiles': queryset})
profile_list.html:
<html><body>
<h1>Profiles</h1>
<ul>
    {% for profile in profiles %}
    <li>{{ profile.name }}</li>
    {% endfor %}
</ul>
</body></html>
Rendering Forms
Serializers may be rendered as forms by using the render_form template tag, and including the serializer instance as context to the template.
The following view demonstrates an example of using a serializer in a template for viewing and updating a model instance:
views.py:
from django.shortcuts import get_object_or_404
from my_project.example.models import Profile
from rest_framework.renderers import TemplateHTMLRenderer
from rest_framework.views import APIView


class ProfileDetail(APIView):
    renderer_classes = [TemplateHTMLRenderer]
    template_name = 'profile_detail.html'

    def get(self, request, pk):
        profile = get_object_or_404(Profile, pk=pk)
        serializer = ProfileSerializer(profile)
        return Response({'serializer': serializer, 'profile': profile})

    def post(self, request, pk):
        profile = get_object_or_404(Profile, pk=pk)
        serializer = ProfileSerializer(profile, data=request.data)
        if not serializer.is_valid():
            return Response({'serializer': serializer, 'profile': profile})
        serializer.save()
        return redirect('profile-list')
profile_detail.html:
{% load rest_framework %}

<html><body>

<h1>Profile - {{ profile.name }}</h1>

<form action="{% url 'profile-detail' pk=profile.pk %}" method="POST">
    {% csrf_token %}
    {% render_form serializer %}
    <input type="submit" value="Save">
</form>

</body></html>
Using template packs
The render_form tag takes an optional template_pack argument, that specifies which template directory should be used for rendering the form and form fields.
REST framework includes three built-in template packs, all based on Bootstrap 3. The built-in styles are horizontal, vertical, and inline. The default style is horizontal. To use any of these template packs you'll want to also include the Bootstrap 3 CSS.
The following HTML will link to a CDN hosted version of the Bootstrap 3 CSS:
<head>
    …
    <link rel="stylesheet" href="https://maxcdn.bootstrapcdn.com/bootstrap/3.3.5/css/bootstrap.min.css">
</head>
Third party packages may include alternate template packs, by bundling a template directory containing the necessary form and field templates.
Let's take a look at how to render each of the three available template packs. For these examples we'll use a single serializer class to present a "Login" form.
class LoginSerializer(serializers.Serializer):
    email = serializers.EmailField(
        max_length=100,
        style={'placeholder': 'Email', 'autofocus': True}
    )
    password = serializers.CharField(
        max_length=100,
        style={'input_type': 'password', 'placeholder': 'Password'}
    )
    remember_me = serializers.BooleanField()
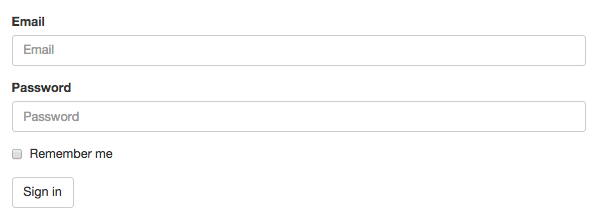
rest_framework/vertical
Presents form labels above their corresponding control inputs, using the standard Bootstrap layout.
This is the default template pack.
{% load rest_framework %}

...

<form action="{% url 'login' %}" method="post" novalidate>
    {% csrf_token %}
    {% render_form serializer template_pack='rest_framework/vertical' %}
    <button type="submit" class="btn btn-default">Sign in</button>
</form>
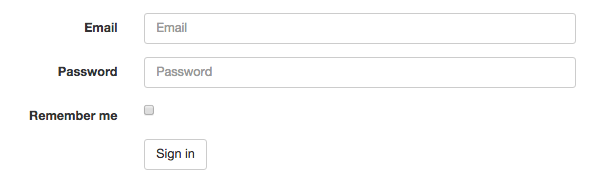
rest_framework/horizontal
Presents labels and controls alongside each other, using a 2/10 column split.
This is the form style used in the browsable API and admin renderers.
{% load rest_framework %}

...

<form class="form-horizontal" action="{% url 'login' %}" method="post" novalidate>
    {% csrf_token %}
    {% render_form serializer %}
    <div class="form-group">
        <div class="col-sm-offset-2 col-sm-10">
            <button type="submit" class="btn btn-default">Sign in</button>
        </div>
    </div>
</form>
rest_framework/inline
A compact form style that presents all the controls inline.
{% load rest_framework %}

...

<form class="form-inline" action="{% url 'login' %}" method="post" novalidate>
    {% csrf_token %}
    {% render_form serializer template_pack='rest_framework/inline' %}
    <button type="submit" class="btn btn-default">Sign in</button>
</form>

Field styles
Serializer fields can have their rendering style customized by using the style keyword argument. This argument is a dictionary of options that control the template and layout used.
The most common way to customize the field style is to use the base_template style keyword argument to select which template in the template pack should be use.
For example, to render a CharField as an HTML textarea rather than the default HTML input, you would use something like this:
details = serializers.CharField(
    max_length=1000,
    style={'base_template': 'textarea.html'}
)
If you instead want a field to be rendered using a custom template that is not part of an included template pack, you can instead use the template style option, to fully specify a template name:
details = serializers.CharField(
    max_length=1000,
    style={'template': 'my-field-templates/custom-input.html'}
)
Field templates can also use additional style properties, depending on their type. For example, the textarea.html template also accepts a rows property that can be used to affect the sizing of the control.
details = serializers.CharField(
    max_length=1000,
    style={'base_template': 'textarea.html', 'rows': 10}
)
The complete list of base_template options and their associated style options is listed below.
| base_template | Valid field types | Additional style options |
|---|---|---|
| input.html | Any string, numeric or date/time field | input_type, placeholder, hide_label, autofocus |
| textarea.html | CharField |
rows, placeholder, hide_label |
| select.html | ChoiceField or relational field types |
hide_label |
| radio.html | ChoiceField or relational field types |
inline, hide_label |
| select_multiple.html | MultipleChoiceField or relational fields with many=True |
hide_label |
| checkbox_multiple.html | MultipleChoiceField or relational fields with many=True |
inline, hide_label |
| checkbox.html | BooleanField |
hide_label |
| fieldset.html | Nested serializer | hide_label |
| list_fieldset.html | ListField or nested serializer with many=True |
hide_label |